
Formulas 4: Nearest-Neighbor Spacing Between Shapes
Summary:
This more advanced example finds the nearest-neighboring for each shape in a pattern. It reports which shape is the nearest-neighbor shape, and the center-to-center distance to that shape. In a further analysis, the image is divided into quadrants by another formula script, and the average nearest-neighbor distance by quadrant is computed, to assess how uniformly the shapes' nearest-neighbor spacings are distributed in each quadrant. All of this analysis is performed using ProSEM formulas.
Demonstrates:
- More advanced formula usage, including context references and computations between objects
- Looping through all objects in an image
- Using an image property, the image size, in a computation
- Creating a summary table to analyze and group data, including a two-level summary
Measurement Example: Find Nearest-Neighbor Distance
Consider this array of randomly-positioned circles. The task at hand is for each circle, find the shape with the shortest nearest-neighbor distance, that is, which shape has the shortest distance between the center of this circle and the center of another circle in the image.

The procedure for this analysis is:
- Setup measurement of a single circle, by setting the ROI to surround a single circle, and setting the Feature Type to Circle.
- Use the Find Similar button to have ProSEM find all circles within the image.

- Next, setup a formula for finding which finds the nearest neighbor for a shape.
// Find the shortest Euclidean distance to the nearest-neighbor object, by center positions.
//   This example script provided as-is by GenISys GmbH.
//
// There is no expectation on the ordering of the objects; all objects are evaluated for distance.  As a consquence,
// each distance is reported twice, once for each object, A-to-B and B-to-A.
//
var DistanceM1M2 = function(a, b) {
    // Returns the Euclidean distance between the center positions of two objects
    xdist = a.CenterX - b.CenterX;
    ydist = a.CenterY - b.CenterY;
    dist = Math.sqrt((xdist * xdist) + (ydist * ydist));
    return dist
}
//
// Some error checking...
if (this.hasOwnProperty('CenterX')) { // only try to find the center if this object has a center to find.
    var measurementCount = group.length;
    if (measurementCount > 1) {
        // hold the minimum distance found, and the label of that nearest neighbor.   (the label is really just for script debugging.)
        var minDist = 999999.9;
        var minDistID = "";
        for (var i = 0; i < measurementCount; i++) {
            // step through each measurement, compute distance to each, and store minimum.
            if ((label != group[i].label) && (group[i].hasOwnProperty('CenterX'))) { // don't compute distance to itself
                thisDist = DistanceM1M2(this, group[i]);
                if (thisDist < minDist) {
                    minDist = thisDist;
                    minDistID = group[i].label;
                }
            }
        }
        //   Output the answer, or an error message.
        minDist; // this line outputs the distance
        //minDistID;  // this line outputs the label of the nearest neighbor
    } else {
        "Need > 1 shape."
    }
} else {
    "Selection has no center."
}
A step-by-step description of this JavaScript is :
- Start with a simple helper function to find the center-to-center distance between two shapes. This will be used repeatedly when searching for the nearest shape.
- The formula then does some error checking, first that the object currently selected in the Images tree is an object which has a center. For this, the JavaScript hasOwnProperty method is used. With this property, the if evaluates to true if the object being evaluated does have a center property. But this method will be false if the current object is an image, or a group, or a line measurement which has no center, in which case no center-to-center spacing can be calculated, so instead a message is displayed.
- The next check is that there is at least one other object to find a distance to. If there is only one stored measurement, then a message will be displayed.
- Next, the formula script steps through every measurement in the same group as this measurement, and computes the center-to-center distance from that object. The script stores the shortest distanct found so far, and in addition, the label of the shape with that shortest distance. This shape label is useful for identifying which object is determined to be the nearest.
- After all objects have been considered, the script returns the answer of the shortest distance. This example script is setup so that this same script can be used to instead output the the label of the nearest neighbor by simply commenting out the output of the distance and un-commenting the output of the label. Using the same script for the both the distance and the ID helps ensure the two are computed identically.
When any circle is selected, the formula results for that circle are displayed in the Variables panel, here that for the selected object, the nearest neighbor object is M_4, at a distance of 434 nm away.

As always, these formulas are computed for every measured shape, and are shown in the data table:

And the formula results can be used when creating Summary Tables. Here is a summary table grouped by image, of the Nearest Neighbor Distance values when three images have been measured. The mean, standard deviation, maximum, and minimum of the nearest neighbor distances within each image are shown.

Categorizing Shapes by Location within the Image
As an extension to this, it might also be desireable to look at the spatial distribution of the circle spacing within the image. For this, a new variable is created which labels each shape with what quadrant that shape is in. The script for this new variable, Quadrant, is:
// Return a string indicating which quadrant the center of this shape is in.
//   UL, UR, LR, or LL.
// Based on the center position and the photo span.
//
var thisquad = "";
//
if (this.hasOwnProperty('CenterX')) {
    //  Y coordinate Upper or Lower
    if (this.CenterY < (image.SizeY / 2.0)) {
        thisquad = "L"
    } else {
        thisquad = "U"
    }
    //  X coordinate, Left or Right.  Upper or Lower
    if (this.CenterX < (image.SizeX / 2.0)) {
        thisquad = thisquad + "L"
    } else {
        thisquad = thisquad + "R"
    }
    // return the answer:
    thisquad
} else {
    "Selection has no center."
};
To determine which quadrant of the image a shape is located in, this script utilizes the image properties of SizeX and SizeY, which are the dimensions of the image. The Object Browser shown to the right whenever the Formula editor is open makes it easy to see what properties are available for use in formulas, including properties of the image itself.
Now the summary table can be created which tabulates the center-to-center spacing statistics by quadrant within the image.

Another way to analyze this measurement data is to use a two-level summary table, in which the center-to-center spacing data is tablulated by both quadrant and for each image file. To define this, the "Edit Grouping" function is used to add a new grouping:
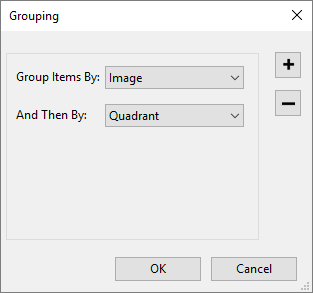
And here's what the data looks like when grouped by two variables.

Summary
This example has shown a more complicated formula, which includes looping through all objects, and some error checking, to demonstrate determining the nearest-neighbor spacing between objects in the image. A supplementary formula using image properties catagorizes each measured shape by which quadrant it is located in within the image. This additional variable is used to create a two-level summary table, which provides a statistical summary by both image and quadrant within the image.