Scripts - Exporting Images
Summary:
Useful ways to export measured images from ProSEM scripts, including full images, ROI images, and adding text overlays to exported images
Demonstrates:
- Exporting images from scripts
- Cropping exported images to show individual regions of interest
- Adding text to exported images, as an overlay or adjacent to the image
Individual measured images can be exported from ProSEM GUI by right-clicking on the image and choosing Export > Image, and the current screen view by choosing Export > Screen View. With some simple scripting, there are many more ways to export measured images.
Script #1: Export All Measured Images
For each image in the currently open project which has at least one stored measurement, this script will export a image which shows all stored measurements for that image.
To use the script:
- Begin with a project having at least one image, with at least one stored measurement.
- Start the script from the Script menu
- The script will ask for a directory to store the exported images, with a default location being the same folder as the first image in the project. Exported images will have the same name as the original image but with "_meas" appended to the end of the filename. Any existing exported images with that same name will be over-written without warning.
- The exported images will be the same size and in the same image file format as the original image, though this can be easily changed with simple edits to the script to save reduced-size images, for example.
The core of the commented script is shown here. Note that when using the Wx library to display dialogs for output or user input, the Wx instance must be created before the GProSEM instance, in the main routine of the script.
#   Ask the user where to save the exported image files, defaulting to the same directory as the first image file
	#   This uses a Wx dialog to allow the user to choose a directory with a platform-default native interface
    exportImagesPath = os.path.split(prosem[0].file)[0]         # this is the path of the first image file in the project
    try:
    # Have to user choose the folder where the save the exported images
        saveFileDialog = wx.DirDialog(None, message="Directory for exported images", defaultPath=exportImagesPath) #, wx.DD_CHANGE_DIR)
        saveFileDialog.ShowModal()
        exportImagesPath = saveFileDialog.GetPath()
        saveFileDialog.Destroy()
    except:
        print("     Error creating file dialog.")
        traceback.print_exc()

    counter = 0
    for image in prosem:        # loop through all images in the project
        if len(image) > 0:      # only export images with 1 or more saved measurements
                # Build the filename for the output file.  It will be the same name as the
                # input file with '_meas' appended to the filename (to not overwrite the original file)
                # the image format will be the same as the input file (same filetype)
            name,ext = os.path.splitext(os.path.split(image.file)[1])
                #   Optional.  Could define a specific output file format here by setting "ext" to the
                #      desired format extension including the '.', for example  ext == '.png'  will export all files in png format
            exportFilespec = os.path.join(exportImagesPath,"{name}_meas{ext}".format(name=name,ext=ext))
                # Note that this will overwrite an existing files with the same name in this location
            prosem.export_item(item=image,path=exportFilespec)
                #  the export_item method can also take optional height, width or scale arguments, otherwise, the output is the same
                #  size as the input file.
            counter += 1
    print ("\n Export Completed, {0} images exported.".format(counter))
    return False   #return True if anything has been modified and changes need to be updated to the main project
This first section of this example displays a dialog for the user to choose a directory where the exported images should be saved. The second portion loops through all images in the project, and if there is at least one stored measurement for an image, the prosem.export_item method is used to export the measured image, with a filename the same as the original file, but the "_meas" appended to the filename.
Here is an example of an exported image:

Script #2: Export Each Measured Region Of Interest
For each image in the currently open project which has at least one stored measurement, this script will export an image of each measured Region Of Interest in that image.
To use the script:
- Begin with a project having at least one image, with at least one stored measurement.
- Start the script from the Script menu
- The script will ask for a directory to store the exported images, with a default location being the same folder as the first image in the project. Exported images will have the same name as the original image but with the name of the Group and then the name of the Measurement appended to the end of the filename. Any existing exported images with that same name will be over-written without warning.
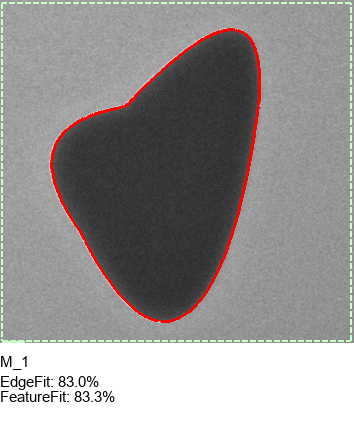
For example, if MyImage.tif has two measured circles, the two exported ROI files will be named:<br>
MyImage_Circles & Ellipses_M_1.tif and MyImage_Circles & Ellipses_M_2.tif - Each exported will also have extra area appended to the bottom of the image, with some text items written to that image. In this example, the labeling are the EdgeFit and FeatureFit Quality Scores, but of course, any measurement property or variable value could be output here. Note, though, that if outputting a feature-type-specific property such as diameter or cd, the script should verify that property exists for any exported ROI measurements to avoid runtime script errors.
The core of the commented script is shown here. Note that when using the Wx library to display dialogs for output or user input, the Wx instance must be created before the GProSEM instance, in the main routine of the script.
#  Initializations for text labeling.
    textBlockHeight = 100   # size of text block to append to the bottom of the image for labeling, in pixels
    font = ImageFont.truetype("arial.ttf",15,encoding="unic")

    counter = 0
    for image in prosem:        # loop through all images in the project
        if len(image) > 0:      # only export images with 1 or more saved measurements
            # Export the full measured image to a TemporaryFile
            name,ext = os.path.splitext(os.path.split(image.file)[1])
            tempFile = os.path.join(exportImagesPath,"TemporaryExport14850{ext}".format(ext=ext))
            prosem.export_item(item=image,path=tempFile)
            for group in image:
                for item in group:
                        # Build the filename for the output file.  It will be the same name as the
                        # input file with '_{groupID}_{measID}' appended to the filename (to not overwrite the original file)
                        # the image format will be the same as the input file (same filetype)
                        # Note that this will overwrite an existing files with the same name in this location
                    exportFilespec = os.path.join(exportImagesPath,"{name}_{groupID}_{measID}{ext}".format(name=name,groupID=group.label, measID=item.label,ext=ext))
                    # Now get the coordinates of the ROI for this measurement
                    # There's a bit of complexity here because ProSEM's coordinate origin is the Lower Left corner of the image
                    # but the PIL library uses the Upper Left Corner.
                    # Also, a small, 4-pixel border is added to the cropped region
                    x_left = int(item.LLX/image.PixelSize)
                    y_lower = image.CountY-int(item.LLY/image.PixelSize)
                    x_right = int(item.URX/image.PixelSize)+4
                    y_upper = image.CountY-int(item.URY/image.PixelSize)-4
                    crop_rectangle = (x_left,y_upper,x_right,y_lower)
                    im = Image.open(tempFile)
                    cropped_im = im.crop(crop_rectangle)
                    # Append some space to the bottom of the image to add some labeling.
                    # Labels could also be added to another edge, or overlaying on top of the image if desired.
                    oldSize = cropped_im.size
                    newSize = (oldSize[0],oldSize[1]+textBlockHeight)
                    expanded_im = Image.new("RGB",newSize,"white")
                    expanded_im.paste(cropped_im)
                    #  Use the ImageDraw library to add some label items.  These items apply to all possible measurement types.
                    #  If adding measurements, for example CD or circle diameter, the code will need to verify those attributes exist for the given measurement
                    #  (ie, lines don't have diameters and circles don't have CD.)
                    draw = ImageDraw.Draw(expanded_im)
                    draw.text((0,oldSize[1]+10),item.label,'black',font)
                    outString = "EdgeFit: {0:.1f}%".format(100*item.EdgeProfileFitQuality)
                    draw.text((0,oldSize[1]+30),outString,'black',font)
                    outString = "FeatureFit: {0:.1f}%".format(100*item.FeatureFitQuality)
                    draw.text((0,oldSize[1]+45),outString,'black',font)
                    expanded_im.save(exportFilespec)
                    counter += 1
                    im.close()
            #delete the temporary file.
            if os.path.exists(tempFile):
                os.remove(tempFile)
    print ("\n Export Completed, {0} images exported.".format(counter))
This example uses the standard Python library PIL, which is included with the ProSEM Python, to crop a temporary export image down to the size of the ROI, and uses that same library to add the labeling text to the exported image.
Here is an example of an exported ROI, with some Quality Scores appended to the bottom of the image: